
I would like to thank you all for supporting me while I was learning to write patterns. Please remember that these are my original free patterns that were written while I was still learning to write them - some are better than others and information may be missing.
This just lists the color changes required to complete this ghan.
I hook ~ 4ply WW RH
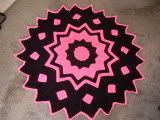
5 1/2 feet across
(37 Rounds)
5 1/2 feet across
(37 Rounds)
This color pattern is based on blocks of 10.
Center - 5 rounds
Black - 5 rounds
***************
Pink - 7 rounds
Black - 3 rounds
***************
Pink - 3 rounds
Black - 7 rounds
***************
With Round 30 completed - sew in your squares, making sure to keep an equal amount of stitches on both sides.
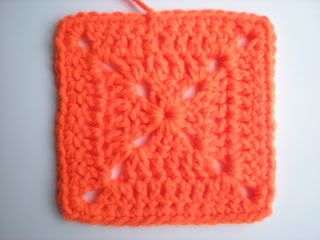
SQUARES:
Fill-in Square
Shell - (2dc, ch2, 2dc) in ch2 sp
ch4 and sl st to join into a loop
Round 1 - ch2 (counts as 1st dc), 2dc, ch2, *3dc, ch2* (3 times). sl st into top of ch2 to join
*note - work over the tail so you can pull the center tightly closed when finished.
Round 2 - ch2, turn, *shell in ch2 sp, dc in next 3 dc's* 3 more times, sl st to join (7dcs across each side)
Rounds 3 - ch2, turn, dc in next 4 dcs, shell in ch2 sp, *dc in next 7 dc's, shell in ch2 sp* (3 times), dc in next 2 dcs and sl st to join round (11 dcs across each side)
Round 4 - ch1, turn, sc in same st, sc in next 4dcs, (2sc, ch1. 2sc) in ch2 sp, *sc across next 11 dcs, (2sc, ch1. 2sc) in ch2 sp*(3 times), sc in next 6 dcs, sl st to join and tie off, weave in end.
Your square is now the perfect size to fit in the valley to keep the peaks at the same height.
Make sure to count your stitches from peak to valley. Place square so that you begin sewing at the halfway point, sew down into the valley and back up the other side.
Do this for all 12 valleys and continue the pattern in dc.
(Hint - leave a really long tail on each square and use that to sew them in. One less end to weave :)
***************
the last Pink was supposed to be 3 rounds
(but I ran out of yarn)
***************
You can continue on for however large you want to make this afghan. I always finish mine with at least a sc for the edges but usually with a sc and a rev sc for strength.
***************
36 comments:
I First of all i would like to tell you how beautiful your crochet items are.. I was wondering where i could get the pattern for the 24 point round ripple/ with squares.. I would like to make it for my sister in laws for Christmas... Again thank you for all your hard work .. Norma from Montana
Thank you so much. You can use any 12 point round ripple pattern. I like mine http://rosereddesigns.blogspot.com/2011/02/rosereds-12-point-round-ripple-free.html
Once you get to round 30 you sew in your squares.
This is more of a tutorial than a pattern. I never did write it out all the way.
Michele
aka RoseRed
I am doing this one as we speak. I am doing the last of the black before you sew in the squares. Question what color do you use to sew in the squares? black or pink or does it matter?
It really doesn't matter.
If I remember correctly - I left really long tails on the squares and used those to sew them in.
I am having problems line up the small squares to sew them on. I get more black stitches open on one side vs the other side. Any hints on how to fix that?
No, I really don't. You should have the same number of stitches on both sides of the V. Have you counted your stitches?
Yes, I have 15 sc on each side of the small square and 15 dc on the afghan, right?
I don't have it here in front of me. I gave it away right after I made it. It's difficult to tell from the picture but the square should fit into the V on it's point. The sides of the square should only go about halfway up the sides of the V.
There should be the same number of stitches on the points to the left and right as there are once you put the square in place and work your first round.
If there's a different number of stitches the points around will be offset - which looks great too. It's really hard to make a round ripple look bad.
What round are you on? The numbers work out if you insert the squares after Round 30 and before Round 31.
I am on round 30 I did the same color rows that you said to do so I am on round 30. I will try and resew the squares trying better to match each side up. My problem is the black. Love the colors. Just hate working with black unless I am in a very bright room.
It should line up stitch for stitch.
If you still can't get it - there's really not much more I can try to explain without a picture of the problem you're having.
If you can email me a picture please make sure that it's in really bright light and preferably in macro mode so I can actually see the stitches. (macro mode looks like a little tulip).
Just click on my name and there's an email link on my profile.
I will try and do it again and if not I will try and send a photo but how? I don't have your email address.
If you click on my name above it'll take you to my profile. click on email.
my computer says that fuctions doens't work when I click on email. Sorry. Can you tell me the count of how many dc on row 30 of the afghan should be?
No, I can't I no longer have it and I made it years ago.
I hope you send me a pic. I'll do my best to try and help you but I really need to see where you're at. If you could place the square into the V it would be helpful.
rosereddesigns (at) bellsouth (dot) net
But on your 12-point afghan, what is the stitch count for row 30? Do you have that pattern? Since it is same until the little squares are sewed in.
I don't have any 12 point round ripples laying around the house to count them. The pattern for the free 12 point round ripple only goes up to Round 7 before you follow the established pattern. I don't have a stitch count to give you.
You should have just about double the amount of stitches on each side of the black V as you do along each side of the square.
I really can't do much more to help you without a picture.
On the last set of pink, did you do 2 rows in the pattern and one reverse sc round (if you had enough yarn)?
I think I just did a round of sc and a round of rev sc to finish it off.
You can do whatever you like. I do remember that I ran out of yarn and couldn't do the wider stripe that I had originally envisioned.
Thanks for your help I have already gotten several comments of the pattern and colors (black and bright pink).
oh, how wonderful!
I'd love to see pic of it! I'm sure it came out great!
Just have to say, you ladies are so helpful. I can't wait to try this one in pale pink or aqua with brown. After I finish the lily pond round afghan first. It sounds so complex, but I'm getting used to reading how to make this work and am very visual. Beautiful afghan
Hi Michele, thanks so much for posting this pattern.. I have been looking for an easy round ripple as I have trouble following some patterns but this looks easy to follow.. Glad I found you.Thanks again.. :)
I think this is a very beautiful crocheted patter, I would love to crochet this item but I have a hard time crocheting any thing by reading pattern's, it is easier for me to do it with hands on kinda deal. You should think about showing how to crocheting this on you sight, it would benefit a lot of people like me.
Christine T. from; Phoenix AZ.
I really don't understand what it is you're asking me to do. How do you envision a blog showing a 'hands on kinda deal'?
This is really beautiful!! I love trying out unusual patterns like this, and seeing the outcome in person! You are truly gifted
Thank you so much.
Maybe you can do a video on YOUTUBE
There are already tons of you-tube videos out there. I usually recommend Nexstitch.com for crochet tutorial videos. I really can't recommend anyone/where else because I generally don't watch them.
I have no plans to start doing videos now or in the future.
Hi I am new here and am Lovin this project just wish I could have printed out but I think I will write out on my computer when I am done and I might find a way to show a video of it when I make another one so people can see it being made if that is ok with you Ms. Shirley I just love the way it is coming out. Jaminneedles
Thanx so much.
What I usually do when I find patterns on blogs is copy and paste them into a Word doc. This way I can print them out and not have to have the computer open when I work on them. I only use these for personal use and I don't share them. A working copy is allowed under copyright law.
Do you want to do a video of the entire afghan or just adding in the squares?
ok I did get the pink squares sewn in but how does this make a 24 point star now how do I get the 24 points now I stll have 12 points
You have the original 12 points from the round ripple. The 12 squares that you just sewed in place make the other 12 points.
Just continue on doing the round ripple repeats and incorporate the 12 points from the squares. That gives you 24 points.
I found to make the insert square to work in to make the points from 12 to 24, it was necessary to make the insert square with less rows than in the instructions. Round 1 and 2 as written. Round 3 was single crochet the amount of stitches listed in the intructions. This allowed the square to sit in the valley and have equal stitches up each side, thereby creating the additional 12 points.
correction to the above post...the insert squares were only the first two rows of instructions given by designer. By row 30 of the original pattern, if a person situates the insert square in the valley, there are equal stitches above and below the corners of the insert.
I'm glad you were able to make it work for you.
I am hoping that upon starting this pattern that the previous readers concerns iron themselves out. Perhaps if you convert your pattern to a diagram to show each individual stitch you may find some readers find that easier to follow (to compare to actual work) Diagrams will show exactly how many stitches in each row/round etc. I am currently wanting to learn how to read diagrams as they seem to be more obvious to the eye in 2D.
Thanks so much this throw will be a gift and looks cool my sister should love it.
Post a Comment