Sunday, February 27, 2011

Scallop & Popcorn Edging for 12 Point Round Ripples


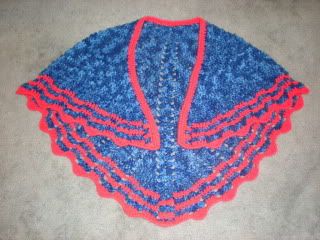
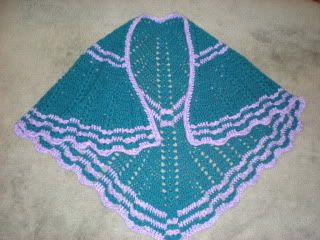
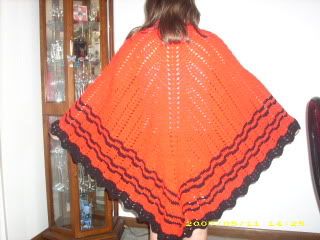
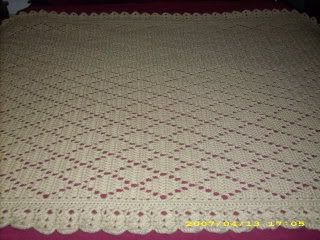
1 Caron Pounder in Lilac
3 Red Heart Super Savers in Baby Pink (just a little bit more than 2)
J Bamboo Handle Bates Hook (which is more of an I 1/5 than a J)

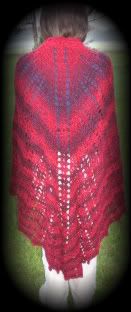
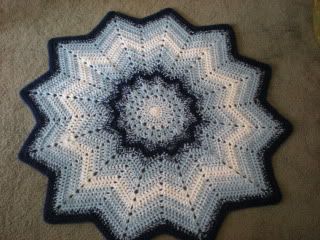
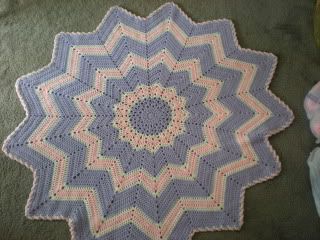
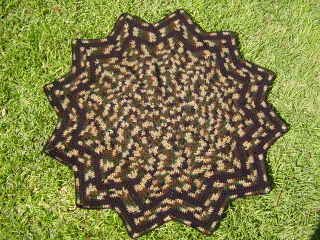
Ghan measures 42 inches from point to point.
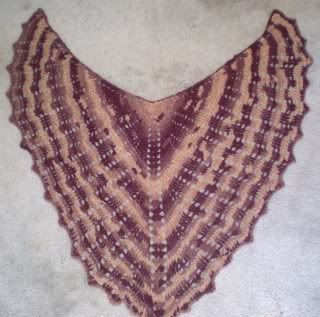
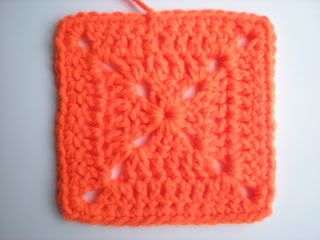
The round ripple.
I like mine.  RoseRed's 12 Point Round Ripple Pattern
It's just a round ripple pattern. Use which ever one makes you happy. ( I do 2 rounds of 2dc shell and 1 round of Vst) you can fudge this at the end if you don't have the right counts. I turn every single row until the border.

When I had 10 dc between the ch2 and the valley I switched colors
Starting with 11 dc from ch2 to valley - 1 row pink
1 row purple
3 rows pink
1 row purple
1 row pink

Then I did 3 rounds of purple (17 dcs from ch2 to valley) and did a boring old scallop st with a picot in the points.

Border Round 1
If you can't figure out where to start it where your yarn ends up then start in the point.
-attach w sc in ch2 sp, (sk 1 dc, in next dc work 5dc, sk 1dc, sc in next dc) 4 times,
- 4dc in valley sp, sk 1 dc, sc in next dc, repeat 4 scallops up the other side.
- in ch2 sp work (sc, ch3p, sc)
- at end, sl st in 1st sc to join

Border Round 2 - do not turn
slst into 2nd dc, ch1, sc in same st, 3sc in center dc, sc in next 2 dcs,

- to work scallops - sc in first 2 dc, 3sc in center dc, sc in last 2 dc, slst around sc into previous round 


- to work valley and make popcorn (you will have slst'd in the last sc on the side) insert hook into front of 1st and back of last dc, yo and draw thru, slst around sc into previous round and continue working next 3 scallops.

- to work point - (last scallop)
sc in 1st 2dc, 3sc in center dc, sc in next dc, ch2, sc in loop of picot, ch3P, sc in loop of picot again, ch2, skip 1st dc, sc in next, 3sc in center dc and continue on as a normal scallop.

Friday, February 25, 2011

RoseRedsDesigns @ Etsy is OPEN!

So much for the Grand Opening I had planned - 
a glitch in PayPal customer service to thank for that.  

There are 2 whole patterns listed in my new Etsy store but more will be added soon.  


Hope to see you there!

Monday, February 21, 2011

Doilyghans - hints & tips

Heart is hosting a 
over at Crochetville.  

For those of you not familiar with Doilyghans - it's the art if creating doilies with yarn to make afghans instead of doilies.  Many are baby sized but there are several large enough doily patterns to make full size afghans.

I would like to note upfront that I do not have experience with converting doily patterns into baby blankets using baby yarn.  This is written from the perspective of creating Doilyghans with 4plyWW yarn.  Hooks recommended would be anywhere from an F to a J depending on the brand and thickness of the yarn you've chosen to work with.

Upsizing doily patterns to thread isn't quite as clear cut as it would seem to be at first glance and there's a few different things to take into consideration as well.  I strongly recommend a gauge swatch of at least 5 rounds in thread and in yarn so that you can measure the difference and have an idea of the finished ghan.

If you choose a huge doily and the ghan is coming out much larger than intended you can also stop short at whichever point you feel looks good and give it a finishing edge.  One of my fav things about crochet is the versatility and ability to leave a pattern behind and add your own personal touches to make it truly unique and yours.

* I think the absolute most important thing a crocheter can do to make this process simpler and end up with beautiful results is to choose a 'good' doily pattern.  There are so many to pick from from free to paid for to those purchased and published in books.  You'll need to find a doily that can lay flat on it's own.  If blocking is REQUIRED then this is not a pattern you want to use with acrylic yarn.

* A very basic rule of thumb is that a doily made in #10 thread will grow by about 3 times.  A 10 inch doily made in #10 thread *should* come out to be about 30 inches.  A lot of this is going to depend on the pattern itself.  Not all doilies are created equal - doilies with many rounds of sc will be much smaller than doilies created with dcs or trcs.

* My basic rule of thumb is to use a doily around 30 rounds.  25 at the bare minimum and 35 for a larger toddler sized ghan.


* Most doily patterns have a lot of chs and ch sps.  You MUST be consistent in your tension and not work them loosely.  If you do have a loose tension on your chains then maybe you should consider dropping 1 or 2 chains from the counts.  This is trial and error and may include a bit of frogging to get just right.

*  You really don't want to use patterns that have ch segments longer than 7 or 8 chains in a row - these will create very large holes in the finished ghan.

* I strongly suggest using a hook recommended for the yarn and for a more open pattern 1 size smaller.  It will help it to hold it's shape better.  You may need to choose between a softer drape and a ghan that holds it's shape.

* Personally, I would avoid most doilies that call for dbtrcs - the openings are just going to be too large.
*  Be careful in choosing your doily for your ghan that you know if it's UK or US terminology.  If it is in fact written in UK and you work it in American terms then it will not lay flat.

* There is also the technique of using 2 strands of 4plyww with a K or L hook.  This will obviously increase the finished size by quite a bit.  According to my dear friend Darski- she states "It also can use a little more openness to the design. The 2 strands do seem to fatten chains and fill in more. It makes the ghan bulky but the openness offsets that as well. It was very warm for all its open parts though."

So - for all of you who have visions of doily-ghans (instead of sugarplums) dancing thru your heads - just grab a hook and your fav pattern and go for it!  What's the worst that can happen - a little bit of frogging?  And the best?  Your latest masterpiece!

Happy crocheting, my friends!

~RR~


Saturday, February 19, 2011

What Tutorials would you like added to RRD? Poll

I've added a poll to the right column asking what 
Tutorials you would like to see here at RoseRed Designs.  

I listed several ideas of my own that I've been kicking around in my head.  
I also listed 'Other' in the poll because I would LOVE to see your ideas as well.

The poll is set up so that you can choose multiple TUT ideas.

If you do check 'other' - please leave you ideas in the comments section.
I'd LOVE to find out what YOUR ideas are and hopefully be able to oblige.

This poll is open for 2 weeks so there's plenty of time for everyone to vote.
I look forward to seeing your comments, thoughts and ideas.

~~~~~~~~~~~~~~~~~~~~~~~~~~~~~~

Monday, February 14, 2011

Red Heart's 75 Days of Give-A-Ways!!!

We all know our Red Heart yarns.  Love them - for their colors and durability, or not - for their scratchiness (Super Saver) Red Heart is a HUGE part of a crocheters life.  Many of us learned to crochet using Red Heart Yarns.  They hold a special place in my heart because of my Grandmother.  She LOVED all the different colors.

I can't believe it but Red Heart Yarns are 75 years old!

Hence, the reason for their 75 Day's of Give-A-Ways.

Red Heart is giving away Daily Prizes including yarn, magazines, hooks, patterns, knitting needles and more.  One Grand Prize winner will win 75 skeins of yarn!!!!! and subscriptions to Crochet Today and Knitting Today!

Head on over to the 

page and enter the drawing.

Wednesday, February 9, 2011

Survivor's Ribbon Shawl - Free Charity Pattern

crochet pattern in pdf format is hosted by Crochetville


How the Survivor's Ribbon Shawl came to be:

I was at church one Wednesday evening and another parishioner brought a friend in with her.  The friend was going for a double mastectomy the next week.  This woman hadn't been in church in a very long time but facing such a frightening surgery brought her face to face with her fears and mortality.

She was blessed and prayed over and spoke with the pastors.  Her courage was truly inspiring.  This poor thing was just barely holding it all together - but she was holding it.  I was so touched that the pattern was born that night.

I spent the next morning creating the graph for the pattern and by that afternoon I started working on the shawl.  We had such a busy weekend planned but I was determined to finish it by Sunday so I could bring it to church at evening service so that it could be delivered to her before the surgery.

I crocheted in the car, all the way to Orlando.  We went to see the Black Sabbath reunion tour with Ronnie James Dio (RIP) singing vocals.  I crocheted in the hotel room before the show, I crocheted in the morning before we left, I crocheted in the car all the way home and somehow I got it done.

I didn't normally go to the evening services but I did that Sunday to deliver the shawl.  It was blessed and anointed and given to the woman who had brought her friend with her.  She was so surprised.

Several weeks later I received the most beautiful and touching thank you card.  She didn't get the shawl until the day she woke up from surgery and her friend was sitting there waiting patiently.  I cried when I read the thank you card.  I never knew how deeply someone could be touched by a prayer shawl until that moment.

I had made her the shawl with the crosses.  It wasn't until after I received the thank you card that I went back in and created the shawl with just the ribbons.  I wanted everyone - regardless of denomination or belief system - to be able to use this pattern.  

I've seen many shawls that've been made for individuals needing comfort, for auctions raising money for different charities and for family members.  My hope is that whomever you make this for - receives whatever comfort possible.

***********************


About the Pattern
There are 2 charts in this pattern.  You can make this shawl
with crosses (as shown) or without.  I did this so anyone - 
regardless of denomination or religion can use this pattern.

This shawl measures approx. 20x60 inches when made with 
an I or J hook (depending on tension and preference) 
and 4ply WW acrylic yarn

The shawl can be worked in either dc or edc.

This 6 page pattern is available in PDF format free
for anyone who has a need for it.

The pattern includes charts and instructions for both shawls, 
Prayer Shawl Ministry Information and Prayer & Care Instructions 
that can be printed out to be given with the Prayer Shawl.

These shawls can be worked in any color.
Awareness Ribbon colors are listed 
in the pattern for your convenience.


**********************
Copyright 2007~Michele Shirley

This pattern is copyrighted for personal & charitable use only.
This pattern may be freely distributed in it's entirety in any format
This pattern and it's derivative works are not to be sold for personal profit.
Use for fund-raising is encouraged.

**********************

Who wants to be Jimbo's Valentine & win a custom crochet hook?

I do!!!  I do!!!


My long time friend and hook maker extraordinaire is 
hosting another contest for a custom crochet hook.   

This one is his special Valentine's hook with an amazing heart on the end!  

Head on over to 
and leave a comment to be included in the drawing!

I own several of Jimbo's hooks.  His attention to detail is amazing.  The quality of his hand turned wooden hooks amazed even my Dad!  I was told "You better take good care of these - these are heirlooms!"  and I do -
I take very good care of my Jimbo hooks.

Most of his hooks Jimbo puts up for auctions 
but you can email him about custom orders also.

Sunday, February 6, 2011

Feel the Wuv Coaster w/ Pic TUT


Materials & Finished size:
with small amount 4ply ww yarn and I hook - 4 1/2 x 5 1/2"
with small amount cotton and an F hook - 4 x 4 1/2"
 

Instructions

ch 8, sl st in 1st ch to form ring

Round 1 - ch2 (counts as 1st dc) and 16 more dc in ring, sl st into top of ch2 to join (17 dc)

Row 2 - ch1, turn, (sc, ch2) in same dc, (hdc, ch1) in next 2 sts, (sc, ch1) in next 5 sts, (sc, ch1, twice) in next st, (sc, ch1) in next 5 sts, (hdc, ch1) in next 3 sts, do not join

Round 3 - turn, (sc, ch1) in next ch-sp, (hdc, ch1) in next ch-sp, (dc, ch1) in next 2 ch-sps, (hdc, ch1) in next 4ch-sps, (dc, ch1, twice) in next ch-sp, (hdc, ch1) in next 4 ch-sps, (dc, ch1) in next 2 ch sps, (hdc, ch1) in next sp, sc in last ch-sp, sl st into top of (sc,ch1), ch2, sc in sp between the top 2 dcs of the first Round, ch1, sl st into 1st ch1

Round 4 -Do NOT turn, ch4, hdc, in ch-sp, (ch3, hdc) in next 2 ch-sps, (ch3, sc) in next 5 ch-sps, for picot in bottom point - (ch4, sc in 3rd ch from hook, ch1), skip next 2 dcs, (sc, ch3) in next 5 ch-sps, (hdc, ch3) in next 2 ch-sps, (hdc, ch4) in sc, slst between the 2dcs of the 1st Round, ch3, sl st into base of the first ch-4 sp

Round 5 - Do NOT turn, ch3, (sc ch3 twice) in next ch-4 sp, (sc, ch3) in next 7 ch-3 sps, (sc, ch3 twice) in center of picot, (sc, ch3) in next 7 ch-3 sps, (sc, ch3, twice) in last ch sp, sl st into sl st, and sl st into the first ch coming out of the sl st to finish.

Tie off and weave in ends.

Tutorial Pictures


Copyright 2009~Michele Shirley~All rights reserved.
*

Saturday, February 5, 2011

Diamond Ghan

an Annie's Attic POD
With Pearls & Lace Edging


With Distinctive Filet Crochet Edging Border
I would like to thank you all for supporting me while I was learning to write patterns.  Please remember that these are my original free patterns that were written while I was still learning to write them - some are better than others and some have been re-written since learning my new skillset.

Annie's Attic is no longer offering the Pearls and Lace Edging pattern.
I do not have a copy of it.

Even if I did, it would violate copyright law to share it with you.
I am sorry for any inconvenience but there is nothing that I can do.
The only thing I can suggest is to contact Annie's Attic directly.
RoseRed's Diamond Ghan

multiples of 9 + 6

For Scarf - ch33
For Ghans - Follow the sizing information below. Undo extra chains.

Baby Ghan - approx 2 pounds - 3ft wide by 4 ft tall - chain 40 inches across and follow repeats until ghan measures approx 36 inches.

Child Ghan - approx 2 1/2 pounds - 3 1/2 ft wide by 4 3/4 ft tall - chain 44 inches across and follow repeats until ghan measures approx 42 inches.

Full Size Ghan - approx 3 pounds - 4ft wide by 6 ft tall - ch 52 inches across and follow repeats until ghan measure approx 48 inches.


Instructions:

Row 1 - dc in 6th chain from hook, dc next 6 st's, *ch2, skip 2 sts, dc in next 7 sts,* repeat across ch until desired length, (twice for scarf), ch 2, skip 2, dc in last st.

Row 2 - ch2, turn, (counts as 1st dc now and throughout) dc in beg of ch sp, *ch2, skip next dc, dc in next 5 dcs, ch2, dc in center of ch sp* repeat to end, ch2, dc in ch sp, dc in 4th ch of turning ch

Row 3 - ch2, turn, dc in dc, dc in ch sp, *ch2, skip next dc, dc in next 3 dcs, ch2, dc in ch sp, dc in dc, dc in ch sp closest to center dc,* repeat to end, dc in ch sp closest to end, dc in next 2 dc's,

Row 4 - ch2, turn, dc in next 2dc, dc in ch sp, *ch2, skip next dc, dc in center of 3dc group, ch2, dc in ch sp closest to next 3dc group, dc in next 3 dcs and ch sp*, repeat to end, ch2, dc in ch sp, dc in next 3 dcs.

Row 5 - ch2, turn, dc in next 3 dcs and ch sp, *ch2, skip dc, dc in ch sp closest to 5dc group, dc in next 5 dcs and ch sp, * repeat to end, ch2, dc in ch sp closest to 4dc group, dc in next 4 dcs

Row 6 - ch2, turn, dc in next 3dcs, *ch2, dc in center of next ch sp, ch2, skip next dc, dc in next 5 dcs*, repeat to end, ch2, dc in center of next ch sp, ch2, skip next dc, dc in next 4 dcs

Row 7 - ch2, turn, dc in next 2dcs, *ch2, dc in ch sp closest to next single dc, dc in next dc, dc in ch sp closest to dc, ch2, skip next dc, dc in next 3dcs*, repeat to end, ch2, sk 1st dc, dc in last 3 dc

Row 8 - ch2, turn, dc in next dc, *ch2, dc in ch sp closest to 3dc group and in next 3dcs and next ch sp, ch2, dc in center dc of next 3dc group*, repeat to end, ch2, dc in ch sp closest to 3dc group and in next 3dcs and next ch sp, ch2, dc in last 2 dcs

Row 9 - ch4, turn, *dc in ch sp closest to 5dc group, dc in next 5 dcs and next ch sp, ch2, sk next dc* repeat to end, dc in last dc.

Repeat Rows 2 - 9 in sequence until piece is desired length.

The beautiful thing about following this pattern is that once the pattern is established - you just follow what's already there. It looks hard - but I promise - it's a very simple ghan to make.

You will have beautiful corners in which to work your edging of choice.
Copyright 2009~Michele Shirley~All rights reserved.
Items made from this pattern are not to be sold online.
Please contact me for commercial use of this pattern.

Hooded Scarf

I would like to thank you all for supporting me while I was learning to write patterns.  Please remember that these are my original free patterns that were written while I was still learning to write them - 
some are better than others and some have been re-written since learning my new skillset

J hook & 4ply ww

Chain 150,
Rows 1-8 - dc across

Hood
Fold in half and measure 9 inches from center in both directions. Mark each st.

Row 1 - dc from marked st to marked st (18 inches)
Rows 2-15 dc across.

Tie off and leave a 2 ft tail to sew the top of the hood.

Finishing
What I do here is to whipstitch from the front of the hood toward the back. About 3 inches from the end I sew it together down on a diagonal angle to the 5th row below to get rid of that square point in the back. Then I lay it out flat and sew the edges to the inside of the hood for a nice and smooth finish.


Copyright 2009~Michele Shirley~All rights reserved.
Items made from this pattern are not to be sold on the internet.

No Sew Gingham Ghan


I would like to thank you all for supporting me while I was learning to write patterns.  Please remember that these are my original free patterns that were written while I was still learning to write them - some are better than others and some have been re-written since learning my new skillset
Finished size:
Approx. 45 x 69 inches before border.

Materials:
I or J hook depending on tension and gauge swatch

Weights listed below are full a full size ghan. 
16 oz RHSS Hunter Green

16 oz RHSS Light Sage
16 oz RHSS Soft White

Gauge :
3 inch square = 10 dc x 5 rows

Pattern Notes:
Pattern is worked entirely in dc.
Gauge is very important. Make sure that the squares are true to size.
Each row contains 2 colors.
Carry the color that is not being used.
There are 115 rows total in ghan.
The afghan is 15 color blocks wide and 23 color blocks high. The turning ch 2 counts as the 1st dc of the 10dc color block.

Instructions
Beginning with Hunter Green - ch 152,

Row 1: Beginning with Hunter Green - dc in 3rd ch from hook to count as 1st dc, dc in next 9 st's, *with Light Sage - dc in next 10 dc's, with Hunter Green - dc in next 10 dc's*; repeat from * to * for a total of 15 color blocks ending with Hunter Green.

Rows 2 - 5 : Beginning with Hunter Green - ch 2, turn (counts as first dc now and throughout), dc in next 9 dc, *with Light Sage - dc in next 10 dc's, with Hunter Green - dc in next 10 dc' *; repeat from * to * for a total of 15 color blocks ending with Hunter Green.

Rows 6 - 10: Beginning with Light Sage - 10 dc, *Soft White - 10 dc, Light Sage - 10 dc*; repeat from * to * for a total of 15 color blocks ending with Light Sage.

Rows 11 - 15: Beginning with Hunter Green - 10 dc, *Light Sage - 10 dc, Hunter Green - 10dc*, repeat from * to * for a total of 15 color blocks ending with Hunter Green

Rows 16 - 115 : Repeat Rows 6 - 11 ten more times for a total of 22 color blocks ending with Hunter Green.

Border

 continuing with Hunter Green -

Round 1 - ch1 sc around entire ghan, working (sc, ch1, sc) in each corner, sl st to join round
Round 2 - ch 1, rev sc around entire ghan, working (rev sc, ch1, rev sc) in each corner, sl st to join.
Alternate Round 2 - ch 1, repeat Round 1.

Tie off and weave in ends.


To make this lapghan size - simply stop after 11 color blocks and halve the amounts of yarn.


Copyright 2007 ~Michele Shirley~ All rights reserved.
Items made from this pattern are NOT to be sold on the internet.

24 Point Round Ripple w/ Squares


I would like to thank you all for supporting me while I was learning to write patterns.  Please remember that these are my original free patterns that were written while I was still learning to write them -  some are better than others and information may be missing.
 

This just lists the color changes required to complete this ghan.
I hook ~ 4ply WW RH
5 1/2 feet across
(37 Rounds)


This color pattern is based on blocks of 10.

Center - 5 rounds
Black - 5 rounds
***************
Pink - 7 rounds
Black - 3 rounds
***************
Pink - 3 rounds
Black - 7 rounds
***************

With Round 30 completed - sew in your squares, making sure to keep an equal amount of stitches on both sides.


SQUARES:
Fill-in Square

Shell - (2dc, ch2, 2dc) in ch2 sp

ch4 and sl st to join into a loop

Round 1 - ch2 (counts as 1st dc), 2dc, ch2, *3dc, ch2* (3 times). sl st into top of ch2 to join
*note - work over the tail so you can pull the center tightly closed when finished.

Round 2 - ch2, turn, *shell in ch2 sp, dc in next 3 dc's* 3 more times, sl st to join (7dcs across each side)

Rounds 3 - ch2, turn, dc in next 4 dcs, shell in ch2 sp, *dc in next 7 dc's, shell in ch2 sp* (3 times), dc in next 2 dcs and sl st to join round (11 dcs across each side)

Round 4 - ch1, turn, sc in same st, sc in next 4dcs, (2sc, ch1. 2sc) in ch2 sp, *sc across next 11 dcs, (2sc, ch1. 2sc) in ch2 sp*(3 times), sc in next 6 dcs, sl st to join and tie off, weave in end.

Your square is now the perfect size to fit in the valley to keep the peaks at the same height.

Make sure to count your stitches from peak to valley. Place square so that you begin sewing at the halfway point, sew down into the valley and back up the other side.
Do this for all 12 valleys and continue the pattern in dc.


(Hint - leave a really long tail on each square and use that to sew them in.  One less end to weave :)
***************

Black - another 7 rounds and
the last Pink was supposed to be 3 rounds
(but I ran out of yarn)
***************

You can continue on for however large you want to make this afghan. I always finish mine with at least a sc for the edges but usually with a sc and a rev sc for strength.
***************


RoseRed's 12 Point Round Ripple - Free Pattern


shaded toddler ghan
girly toddler ghan
Camo Ghan

I would like to thank you all for supporting me while I was learning to write patterns.  Please remember that these are my original free patterns that were written while I was still learning to write them - some are better than others and some have been re-written since learning my new skillset

Amount of yarn needed will depend on the size of the finished afghan.
Special Stitches:
shell - (2dc, ch2, 2dc)
vst - (dc, ch2, dc)

dcdec - yo, insert hook into next st, yo and pull through, yo and pull through 2 loops leaving two loops left on hook, yo and insert hook in next st, yo and pull through, yo and pull through 2 loops, yo and pull through all 3 loops on hook


Instructions:

Round 1 –
ch3, working over tail place 11 dc in first ch made, sl st to top of ch3 to join. Pull tail to close center.

Round 2 –
ch2, turn, dc in same st as ch2, 2dc in each st around, sl st to top of ch2 to join.

Round 3 (For a solid center) –
ch1, turn, Vst in next st, *dcdec over next 2 sts, ch2, dc in same st* 10 times, dcdec over next 2 sts, ch2, dc in same st, (to join the round - begin as you would a dcdec) yo, insert hook into next st, yo and draw thru st, yo and draw thru 2 loops, sl st into ch1 to join and draw thru all 3 loops.
Alternate Round 3 –
(For a lacy center) ch4 (counts as 1st dc and ch2), turn, dc in same st. 1st
Vst made. Skip next st and Vst in every other st around.,

Round 4 –
turn, sl st in next 2 sts, ch1, Beg shell in ch2 sp, shell in each ch2 sp around, sl st into ch1 of Beg shell to join.

Round 5 –
sl st into next st, ch2, turn, *skip next 2dcs in center of the valley, dc in next st, shell in shell, dc in next dc* 11 times. Skip next 2dcs in center of the valley, dc in next st, shell in shell, sl st into top of ch2 to join.

Round 6 –
turn, sl st into next st, ch2, dc in next st, Vst in shell, dc in next 2 sts, *skip next 2 dcs in center of the valley, dc in next 2 sts, Vst in shell, dc in next 2 sts* 11 times, sl st into top of ch2 to join

Round 7 –
sl st into next st, ch2, turn, *skip next 2dcs in center of the valley, dc in next 2sts, shell in shell, dc in next 2sts*, 11 times, skip next 2dcs in center of the valley, dc in next 2sts, shell in shell, dc in next st, sl st into top of ch2 to join.
Rounds 8 –
completion' Continue working in established pattern (Shell, Vst, Shell) increasing in the shell rounds only.
Make sure that your last round before the border is a shell round.
It gives it a much nicer finished edge.

Border:

Notes – Remember to look at the center of your round ripple. Make sure that the right side is facing.

It really doesn’t matter if you turn your work or not for the sc border so long as the right side is facing.

Round 1 – ch1 turn, (or not) sc in each st, (2sc, ch2, 2sc) in each shell and a ch1 in each valley, sl st to 1st sc to join.

Round 2 – rev sc in each sc except in peaks and valleys.

- To work each Peak: – The shell is (2sc, ch2, 2sc) - rev sc in 1st sc, skip 2nd sc, 2rev sc in ch2 sp, skip 3rd sc, rev sc in 4th sc).

To work each Valley: rev sc down the side towards the valley, skip the last sc, rev sc in the ch1 sp, continue placing a rev sc in each sc until you reach the shell in the Peak.


Copyright 2009~Michele Shirley~All rights reserved.
Items made from this pattern are NOT to be sold on the internet.
***********************

Thursday, February 3, 2011

A new security setting for FaceBook

I know - way off the topic of crochet but very important.

Most of us use FaceBook.  I keep mine for personal friends and family only.  I did come across a very important piece of information this morning posted and shared by a friend of mine.

You can now secure your FB sign-in information when working wirelessly.  The new security feature uses https instead of http to sign in.  I'm certainly not a computer guru but I do know that the little S on the end stands for SECURE.  If you notice your online banking pages will have the S on the end also.

What does this mean?  It means that anytime you sign into FB using a wireless connection - Starbucks, McDonalds, your own wireless router - anywhere where the information floats thru the air - your information will now be secure IF YOU CHECK THE LITTLE BOX THAT SAYS SO.

You can also check the little box that says 'email me if someone other than this computer or wireless device signs on'.  I did.

There's a great write-up and picture on how to do it found here http://gawker.com/5744229/the-facebook-setting-you-should-change-as-quickly-as-possible

Supposedly - all of FaceBook should have the ability to sign in securely by the end of the day.

Let's pass this on and keep our online friends safe from the 'bad guys' that are out there.

Tuesday, February 1, 2011

Hey there and welcome!

I just wanted to pop on here and say welcome to the RoseRed Designs Blog.  Many of you are familiar with Inspired Crochet Design.  It's actually a pretty popular blog which is surprising to me since I neglect to post frequently.

Since everyone on Crochetville already knows me as RoseRed and I've finally decided to pursue designing for real I've also made a few business decisions.  I'm sure it will take a little while for RRD to get off the ground. So many people are familiar with ICD. 

I have faith that this is the correct decision for me at this time.  I hope to share many patterns and ideas with all of you.  I promise that I will do my best to blog more often.  (yeah, I know - I've said that before but I really mean it)  I also plan to go thru all of my early patterns and re-release them with any corrections or updates that I feel are necessary.

I've been thinking about hosting the pdf files for free patterns at Crochetville.  If you guys have any thoughts - please leave them in the comments sections.

I'll be leaving comments open and un-moderated to start with.  Other than people having conversations in other languages I've never had a problem with comments.  Let's hope that it remains that way.

I have ideas for several tutorials as well.  If there's anything specific that you would like to see a TUT for just let me know.  Who knows - it may already be on my list of ideas.

As always - thanx for stopping by.